Using user story scenario
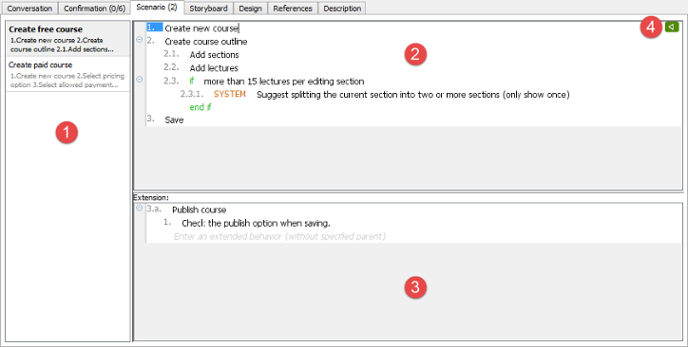
A user story scenario specifies the interaction between the end user and the system in completing the goal represented by the user story. The interation is written in the form of steps, which involves the actions user has to perform and the response given by the system.
This page will introduce the user story scenario editor by describing its features, such as model element link presentation options and scenario extension.
Accessing the scenarios of a user story
To access user story scenarios of a story:
- Locate the user story first. Here are some of the typical ways to locate a story.
- If you own the URL of a user story, open the URL by selecting Diagram > Link from the toolbar. Paste the URL in breadcrumb in press Enter.
- To locate a user story in a particular use case, open the use case by selecting UeXceler > Use Case first. Find the story under the User Stories tab on the right hand side.
- To locate a user story in a sprint, open the sprint from the UeXceler > Sprint page and find the story there.
- You can also find a user story in the UeXceler > User Story page. Note that if your story was added into a sprint, you have to enable the In Sprint option in the Advanced Filter.
- Open the story by double clicking on it.
- Open the Scenario tab.
Overview of the scenario editor
 |
| User story scenario editor |
|
|||||||||||||||
| Description of user story scenario editor |
Using statement control
Instead of entering pure text as step, you can wrap the steps with controls like if-then-else, system response, for-each, etc.
 |
| The use of 'if' |
There are few ways you can take to add a statement control:
- Press Ctrl-Space in a step and select the type of control from the popup list.
- Type the keywords of the control (e.g. if, elseif, while, foreach, exitloop, jump) and press Space to create.
- Right click on a step and select Add Control > %CONTROL_TYPE% from the popup menu.
- Select UeXceler > Add Control from the application toolbar and then select the %CONTROL_TYPE% to create.
Working with multiple scenarios
Very often, a user story can be accomplished by multiple ways. Let's say you have a user story for processing a payment. It may have multiple scenarios for handling different ways of payments like credit card payment, PayPal, etc. Sometimes, different results may be produced under different conditions during the course of interaction. Take ATM as an example. To withdraw cash from ATM may results in a success or a failure when there is an insufficient funds. All these variations can be described by creating multiple scenarios.
To create a user story scenario:
- Click on UeXceler > Add Scenario in the toolbar.
- Enter the steps of the new scenario.
- Rename the scenario. You can rename scenario by right clicking on the scenario in the list of scenarios and then selecting Rename...
- You are prompted for a new name. Enter the name and confirm editing.
Related Resources
The following resources may help you to learn more about the topic discussed in this page.
| 10. Recording confirmation items in user story | Table of Contents | 12. Perform scenario-based wireframing |
