BPMN task and sub-process
A business process (BPMN) is mainly formed by activities that need to be performed to complete the process. There are two kinds of activities in business process modeling - task and sub-process. You draw a task when the work in the process cannot be broken down to a finer level of detail. You use a sub-process when you want to model the internal details of work in a lower-level process diagram.
A BPMN task is an atomic activity which represents work that is not broken down. On the contrary, sub-process represents work that is broken down to a finer level of detail.
| Task and sub-process |
Task markers
You can assign markers to task. There are three markers: Loop, Multi-Instance, Compensation. A task can have one or two of these markers. Assignment of markers is done through the specification dialog box of task.
|
|||||||||||||||
| Different markers of task |
Adding a Loop marker
- Right click on a task and select Open Specification... from the popup menu.
- Select Standard Loop for Loop type. Click OK to confirm the changes.
NOTE: You can click on the ... button next to Loop type to set the loop condition, counter and the maximum number of iteration.
Adding a Multi-instance marker
- Right click on a task and select Open Specification... from the popup menu.
- Select Multi-Instance Loop for Loop type. Click OK to confirm the changes.
NOTE: You can click on the ... button next to Loop type to set the ordering of loop, either parallel or sequential.
Adding a Compensation marker
- Right click on a task and select Open Specification... from the popup menu.
- Check Compensation at the bottom of specification and click OK to confirm the changes.
Task types
In business process modeling there are several types of task for you to separate the behavior of different tasks. You can set a type by right clicking on a task and selecting Type, then the type from the popup menu.
|
|||||||||||||||||||||||||||
| Types of tasks |
Sub-process markers
You can assign markers to sub-process. There are four markers: Loop, Multi-Instance, Ad-hoc and Compensation. A sub-process can have up to three markers, excluding the marker for collapsed: A loop/multi-instance marker, an Ad-hoc marker, and a Compensation marker. Assignment of markers is done through the specification dialog box of sub-process.
|
||||||||||||||||||
| Different markers of sub-process |
Adding a Loop marker
- Right click on a sub-process and select Open Specification... from the popup menu.
- Select Standard Loop for Loop type. Click OK to confirm the changes.
NOTE: You can click on the ... button next to Loop type to set the loop condition, counter and the maximum number of iteration.
Adding a Multi-instance marker
- Right click on a sub-process and select Open Specification... from the popup menu.
- Select Multi-Instance Loop for Loop type. Click OK to confirm the changes.
NOTE: You can click on the ... button next to Loop type to set the ordering of loop, either parallel or sequential.
Adding an Ad-hoc marker
- Right click on a sub-process and select Open Specification... from the popup menu.
- Make sure the type of sub-process is set to be Embedded Sub-Process. Check Ad-hoc in the Details section and click OK to confirm the changes.
Adding a Compensation marker
- Right click on a sub-process and select Open Specification... from the popup menu.
- Check Compensation at the bottom of specification and click OK to confirm the changes.
Sub-process types
There are several types of sub-process for you to separate the behavior of different sub-processes. You can set a type by right clicking on a sub-process and selecting Type, then the type from the popup menu.
|
||||||||||||
| Types of tasks |
Breaking down a sub-process
A sub-process can be opened up to model the detail in a lower level. To open up a sub-process, click on the plus marker in sub-process and select New Business Process Diagram. This will create a new business process diagram that belongs to the sub-process. In the sub-process diagram you will see the in/out flows that allow you to connect the flow from parent to sub-diagram. Click here you if you want to learn more about in/out flows.
 |
| To break down a sub-process |
| NOTE: | Once a sub-process diagram is created, its detail will be shown as the sub-process shape as a thumbnail of the diagram. To hide the thumbnail, click on the minus marker at the bottom of sub-process to turn it off. |
Re-using elements from parent diagram
In the sub-process diagram, you can re-use pools, lanes and flow objects that appear in the parent diagram. To do this, right click on the sub-process diagram and select Add Pools/Lanes/Sub-Processes/Gateways from Parent Diagram... from the popup menu, and choose the element to reuse. Elements being re-used will have dog ear appeared at their corners.
 |
| A sub-process diagram with a lane reused from parent diagram |
You can jump from a re-used element back to the parent diagram through the resource-centric interface.
 |
| Jump to parent diagram |
Defining procedure of activity
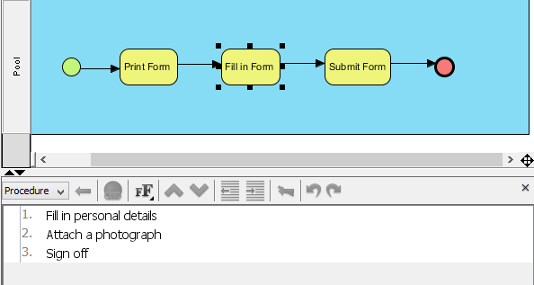
An activity within a process represents work need to be done. Each activity can be formed by a number of steps. For example, a task Process Application involves 2 steps - validate application, confirm application. To document the steps of an activity, you can make use of the procedure editor.
 |
| Procedure of a task |
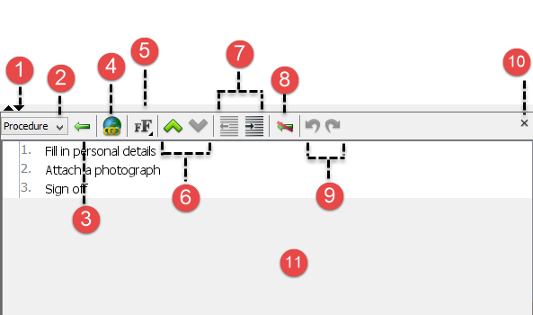
An overview of procedure editor
 |
| An overview of procedure editor |
|
||||||||||||||||||||||||||||||||||||
| Description of procedure editor |
Showing/Hiding procedure editor
The procedure editor is opened in business process diagram by default. To hide it, right click on the background of business process diagram and deselect Show Procedure Editor from the popup menu. You can select the same menu to show it when hidden.
| NOTE: | Alternatively, you can close the editor by clicking on the cross button at the top right corner of editor panel. |
Documenting the procedure
- Select the task or sub-process that you want to document its procedure.
- Click on the first row labelled 1 and enter the first step.
- Press Enter to go to the next step. You can create a sub-step by pressing Tab on a step. Pressing Shift-Tab decreases the indentation of a sub-step. Repeat step 2 and 3 to enter the remaining steps the activities involve.
Related Resources
The following resources may help you to learn more about the topic discussed in this page.
| 2. Pool and lane | Table of Contents | 4. Event |
